Greensand, Sand Casting & Greensand Recipe

Sand Casting is the process of using sand to produce a negative mold to pour whatever medium you what your cast to be. The sand itself is not normal sand in most cases, it has had things added to make it more resistant to heat and to cast a finer finish. Fine sand is often used with a bonding agent (clay normally - bentonite and kaolinite) sometimes oil but used less because of rising prices and then the mixture is moistened to make the casting sand, you can read more about that below if you wish to make your own.
Also known as sand molded casting. "sand casting" can also mean the object that has been cast via the casting process.
The game is also shaped by the symbols fans carry from one generation to the next, from legendary club colors to national-team memories. A carefully chosen retro football shirts can reflect that passion beyond match day.
Is sand casting financially viable or overly expensive?
Yes it is very viable , sanding casting is used by commercial foundries all over the world, the sand is used over and over thousands of times, the sand itself is not expensive compared to alternative methods, in fact it's so financially viable it's used for over seventy percent of all metal castings.
Sand casting process
The basics on how to cast with sand with a flask. please note all images and text are copyrighted on the page, please ask to use or just link to the site.
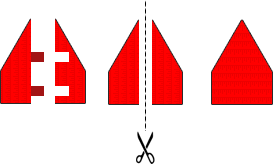
The simplest way to cast most objects and shapes is to cut them in half and add pegs to join them back together so it's in two half's. This is so the "pattern" can be removed with ease and without distorting the overall sand cast's shape and detail.
Step One:
Place one half of your casting flask down on a flat surface lightly dusted with talcum powder, then place one have of the the object you wish to cast, dusting it with a fine coat of talc. Grab a sieve to pass through the first layer of sand onto your soon to be sand casting this it too increase the detail of the final cast.
Slowly add more sand compacting it with a ramming tool as you go, take care not to hit or damage the pattern. pack it to the top then take off the excess sand off by sliding a with a long piece of wood across the top.

Step Two:
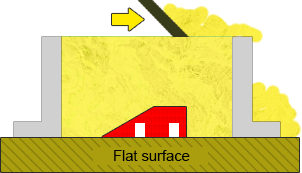
Now place another flat surface on the top of the flasks half, lifting both flat surfaces at once, rotate the flask up the other way as shown by the figure on the left. Remove the now top flat surface to reveal the pattern.
Step Three:
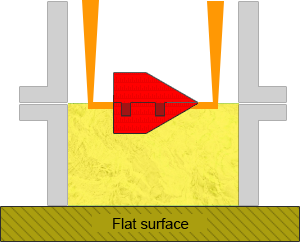
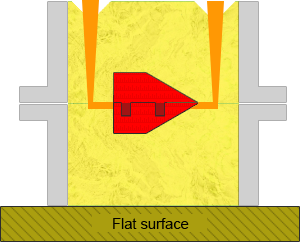
Add the other side of the sand casting flask, aligning the sides perfectly (then apply the bolts, cache or lock depending on the type of flask you have) then add the other half of the pattern.
Place two cone shapes pegs (sprues) these will be removed later to become the pouring holes for the molten metal. Then dig carefully two small channels to the pattern, making sure to not leave any loose sand that could wreak the cast later on.
Step Four:
Like step one, lightly dust talcum powder over the pattern and all sand showing then again grab the sieve to pass through the first layer of sand through onto the talc dusted pattern then like step one slowly add more sand compacting it as you go, then striking off the excess sand once again.
Further dig out the pouring inlet around the sprues to make pouring easily.
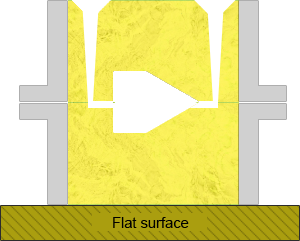
Step Five:
Take the sprues out by lightly twisting them. Remove the top half of the flask by placing a flat surface on the top and undoing the cache or lock and lifting it straight up taking care not to wiggle or move it which will distort the mold once clear turn the flask upside down and place on a flat surface. Carefully remove the pattern (both sides) and put both sides of the flask together making sure to line up the sides and fasten the lock(s).
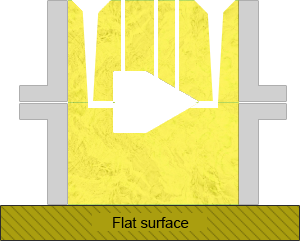
Step Six:
Add some air vent for the air to escape when pouring the metal. note this could be done the step before to avoid damaging the mold (inside out oppose the outside in which could push sand into the negative space)
Use a long piece of wire or a small in width knitting needle to make the air venting.
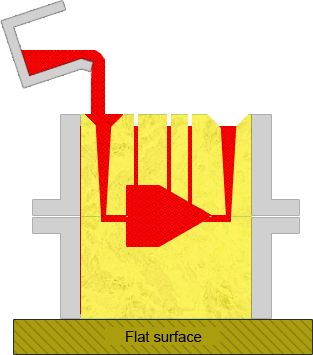
Step Seven:
Heat your metal to melting point and pour into the poring hole(s) made by the removed sprues, be careful not to cover the air holes with molten metal
Wait for it to cool down and then open the flask and hose down your almost complete sand casting.
Cuts the air vent and pouring sprues off and clean up your cast as desired and you're done! Many Happy Castings!
How to make the Greensand?
Greensand Recipe:
- 45KG Sand Silica or Olivine sand (see wiki)
- 5KG Powdered Bentonite
- 3 KG Water (3.7 Liters)
1.Mix the sand and water thoroughly, while slowly adding the bentonite (fine clay) mix very! very! well! 2. Flatten the mixture until flat like a pancake and then stir (fluff up) the mixture with shovel.
Repeat step two, 4 times maybe more, this technique is called "mulling". I cannot stress how important mulling is! mulling coats each fine grain of sand with a bit of bentonite clay.
Important Notes:
Bentonite is used in "clumping" cat litter, you may be able to use some types of cat litter grounded up but 110% wear a mask and do it in a open area it's not good for you lungs at all! or eyes for that matter, once moistened it should be okay but always be careful.
Green sand does not retain moisture very well and if it drys out you with have to add water again and repeat step two (basically re-mulling it) this should bring it back to it's former state by returning the moisture and re-coating the sand with clay.
Safety: Pouring aluminum, brass, bronze or any other metals with a low-melting point or alloy into green sand is very safe! iron and steel it not recommend unless you know what your doing.
Also see our article about making green sand
Does sand casting meet your casting needs?
What do i mean? meet you need? well like most things, there are different types of casting! lost wax casting, lost foam casting and centrifugal casting are just some of the other types, Each with their advantages and disadvantages I suggest reading our other articles to gain more insight.
Briefly speaking, Lost foam is fast to shape the medium and allows rough quick casts, Lost wax allows the highest detail combined with centrifugal casting for silver and gold reduces casting errors and failed castings for metals that tend to cool down before the pour is complete.
More about the lost wax process: http://www.newartsfoundry.com/lost-wax-casting-process/
Where to buy the sand?
There are local and online places to get green and foundry sand best to just google "green sand" followed by your location "my town" or failing that just we have a tutorial on how to make [green sand](http://www.delftclay.co.nz/how-to-make-green-sand/).
How to melt the metal?
Foundry Sand Casting Ramming Tool: http://www.instructables.com/id/Foundry-Sand-Casting-Ramming-Tool/
What types of metals can you use with cast castings?
All the metals below are commonly used metals to cast in sand with. Aluminum and Pewter being the most common among hobbyist because of their low melting point.
| Good Sand Casting Metals | Metals Melting Point |
| Gold | 1,064 °C |
| Silver | 961.8 °C |
| Copper | 1,085 °C |
| Brass | 900 to 940 °C |
| Brass | 900 to 940 °C |
| Bronze | About 950 °C |
| Aluminum | 660 °C |
| Pewter | 170–230 °C |
| Lead | 327.5 °C |
Video demonstration - How to cast with sand
Sand Casting Process with Philip White and Jenny Dunseath in the foundry at Camberwell College of Art London.