Build a blacksmith forge for $50 from junk.

Disclaimer: The material on this website is provided for general information only, and on the understanding of how a forge works, this is not professional advice on how to make one. I am not responsible for your safety. Any damage or loss caused by the use of this information is not my responsibility.
Homemade Blacksmithing forge!
Building a blacksmith forge from scratch isn't as difficult as most people first think. The principle behind a forge is super simple and requires very few parts and nothing that can't be picked up at your local recycling center or even brought new from your local department store!
To make things simpler for almost everyone reading this post with the hopes of making their own blacksmithing forge I am going to assume you all are good with your hands and have a reasonable level of problem-solving skills, you are going to need to be, if you want to be an amateur blacksmith after all.
Across leagues and international tournaments, football shirts carry the colors, stories, and identity that fans remember long after the final whistle. Choosing a Spain football jersey offers supporters a tangible way to celebrate that shared history.
Since it would be very difficult to list parts for everyone around the world to buy new I am just going to explain the basic principle of a blacksmithing forge and what you will need to find in some shape or form and assemble and then go over what I found and how I made I built mine.
It should be noted that it might be possible to pick up a forge very cheaply, so be on the lookout. I got another forge complete with hand-cranked blower, electric blower, chimney, firebricks, the works! for less than a $100 NZD ($50 USD) from a scrap dealer who was going to scrap it!
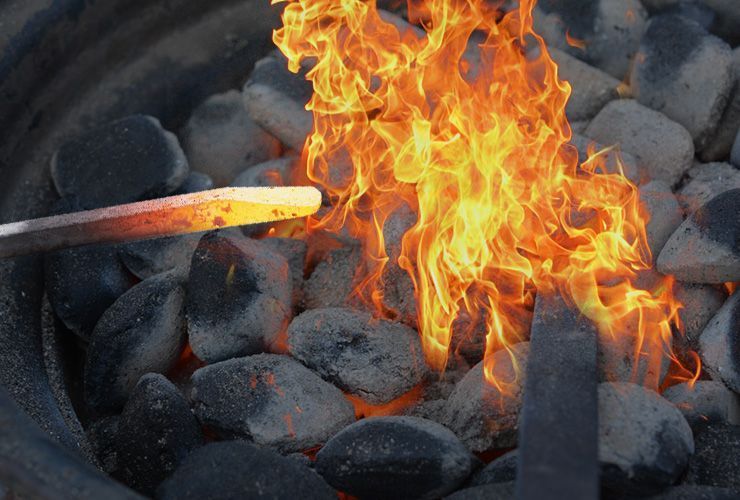
Okay! Time to Strike while the iron is hot!
Blacksmithing forge principles
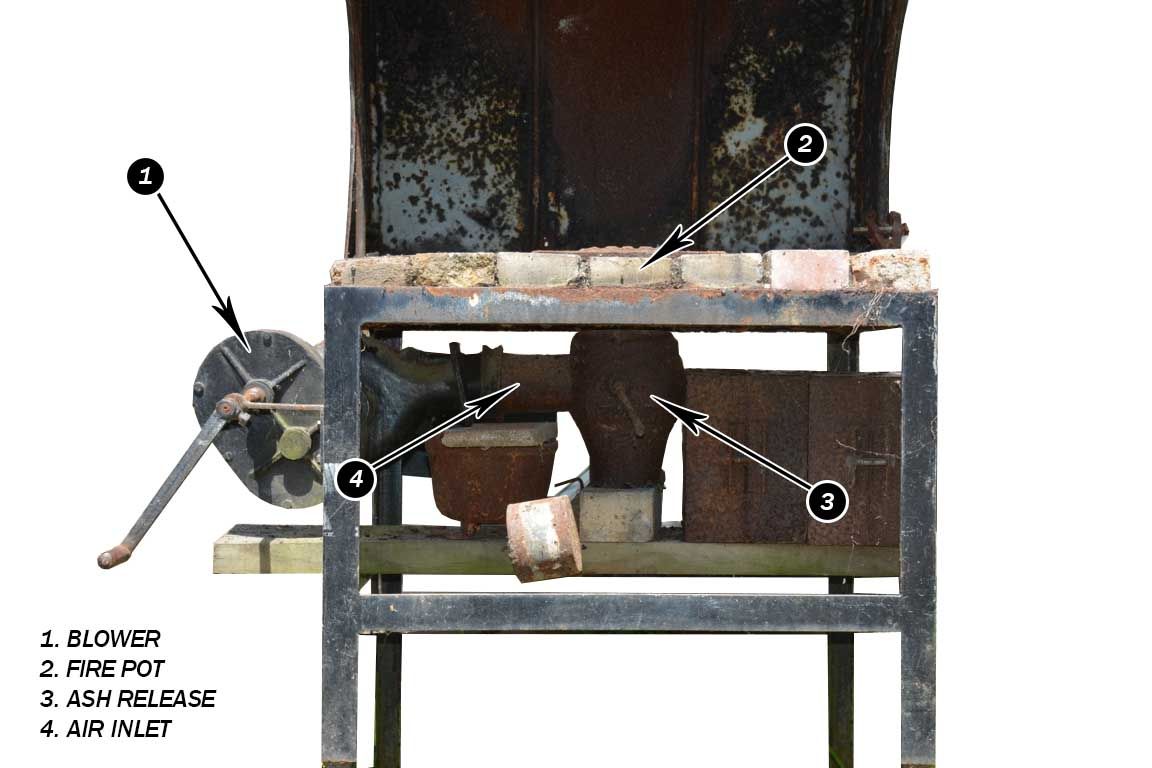
If you're really switched on you might have notice the forge above has no "ash release" and #3 isn't for ash release either, truth is the forge above is a little worse for wear, however it makes a good basic example.
How to make a Blacksmith's forge from scrap?
This will be a guide to make a forge without welding so readers with limited tools can still follow along but if you have a welder, I suggest you make welds where applicable instead of using bolts like myself.
Now that we know the principles of what makes a forge work, lets make one!
The three main parts you will need:
- T-Shaped Pipe: air inlet/ash release
- Fire Pot (car rim in this case)
- Air Blower
Other Parts you will need:
- Hose clip
- Small rectangular length of mild steel.
- Piece of mild steel to cover main hole in car wheel rim.
- Small bits of metal to cover other holes in rim.
- Bolts and washers
- Door hinge
Minimum tools needed to make this forge:
- Drill press or power drill
- Rivet Gun (optional)
- Hacksaw (metal cutting)
- Hammer
Warning!
Read this safety advice!!! Do not use galvanized metals when heated (either by the forge or welding) the zinc vaporizes and inhaling clouds of this vaporized zinc is poisonous! Do not use any galvanized metals at all in this project.
Also, don't use melts with low melting points like aluminum.
Be careful of painted metals burning the paint off can produce toxic fumes.
Keep children, animals and people who have zero common sense away at all times when using or even constructing this forge.
Back to it...
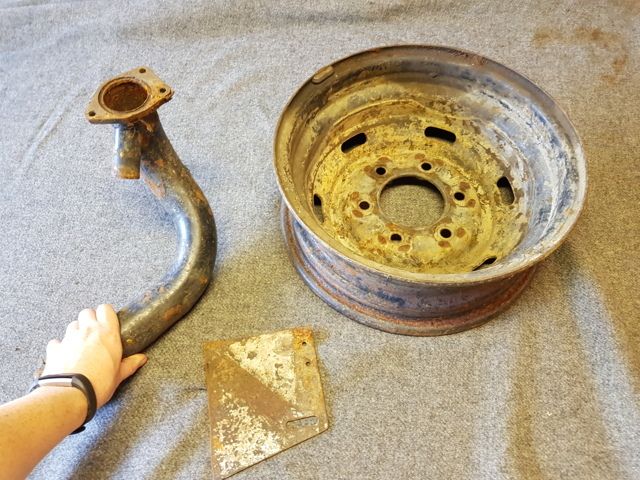
We will need to look for a part that can fill the roles of the air intake and the ash release, Ideally a "T" shaped pipe would be great (welders can just use a normal pipe 2-3 inches in diameters and weld into a T shape), I failed to find a "T" shaped pipe so I went for the closest thing I could make work without welding or excessive cutting (part of a cars exhaust I think).
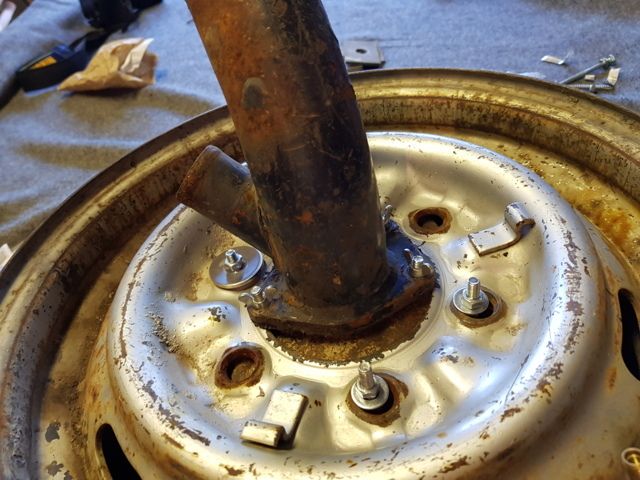
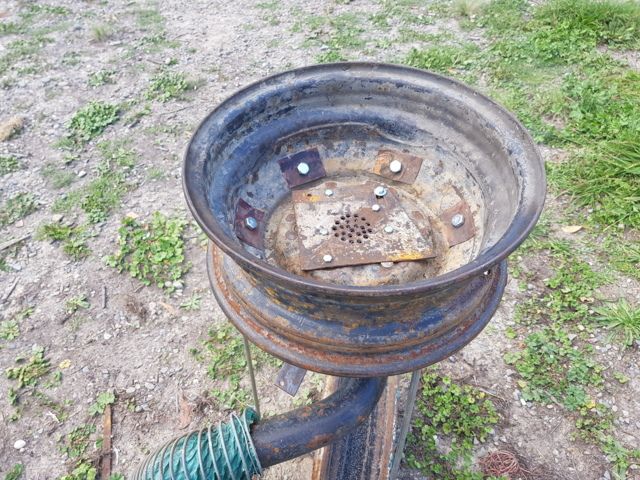
For the Fire Pot/Pit I used an old car wheel rim.
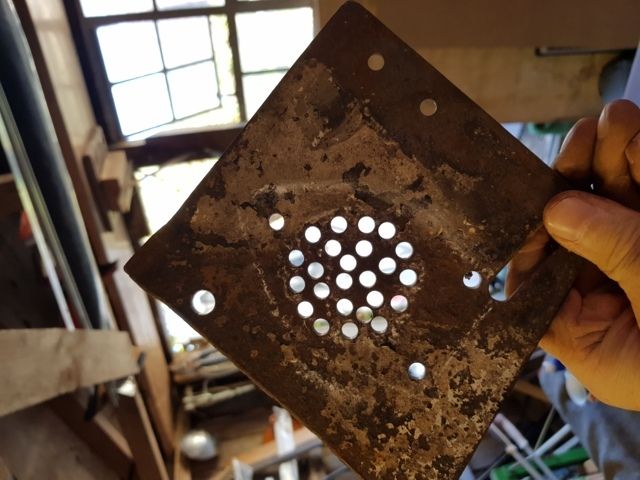
I also found a piece of mild steel to make a grill out of to stop big bits of ash/coal falling down into the air inlet pipe.
As for the blower, I'll go over your options later on.
The first step is to attach the T-Shaped Pipe to the Fire Pot, the way I did this was to make use of the piece of mild steel I had for the grill, If you managed to find a proper T-Shaped Pipe and don't have a welder, then you will have to cut 2-4 flaps, then fold them 90 degrees and drill holes so the pipe can be bolted fire pot / grill.

I placed piece of mild steel in the best place to cover the hole in the wheel and then bolted it temporarily so I could find the right alignment of my air inlet.
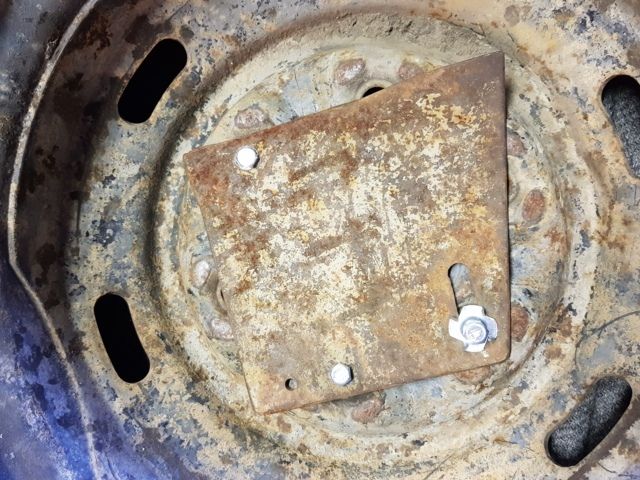
Once I found the right alignment I marked the mild steel for drilling, then once drilled I checked if everything fitted correctly.
Next the air holes in the grill needed to be drilled so air could get to the fire pot and to stop coal falling into the air pipe, this is why I aligned the grill with the firepot (car wheel) and the air inlet with the grill so I know where to drill the holes.
I was quite fortunate that I had mild steel otherwise this would have taken a very long time with the quality of drill bits I have.
There is no trick to doing this just draw around your pipe with a piece of chalk and then drill holes in the middle be careful not to drill them too close together and risk "merging" the holes into bigger ones.
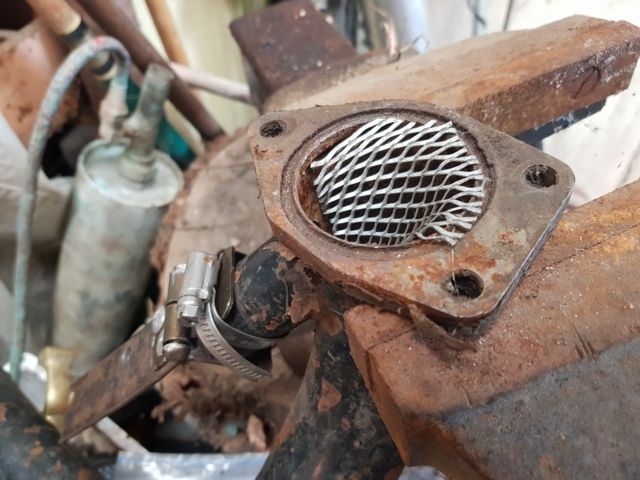
This is a step you only have to do, if like me you failed to find a T-Shaped pipe and used a pipe-like mine instead. I had to add an additional grill to funnel falling ash into the right pipe, this could have been avoided if I'd used the bigger pipe as the ash trap and the smaller pipe as the air inlet but the bigger pipe was just too good of a match with my air blowers pipe size and I would have had to cut the big pipe down since the curve would not have worked hence why I went with this awkward setup instead.
Now we have to plug the excess holes in the car wheel rim and remove anything that shouldn't be there, that would melt, on this rim I had to remove the tires air inlet and a little lead weight attached to the rim. To plug the holes I bolted a piece of copper over the holes, simple.
The "ash release" or "ash trap" is probably the most complicated part of the forge and yet it's not even that hard to make.
To make the ash release all you need is a bent piece of metal that width is the same or larger than the ash outlets, an old door hinge, a hose clip and some rivets or small bolts and nuts.
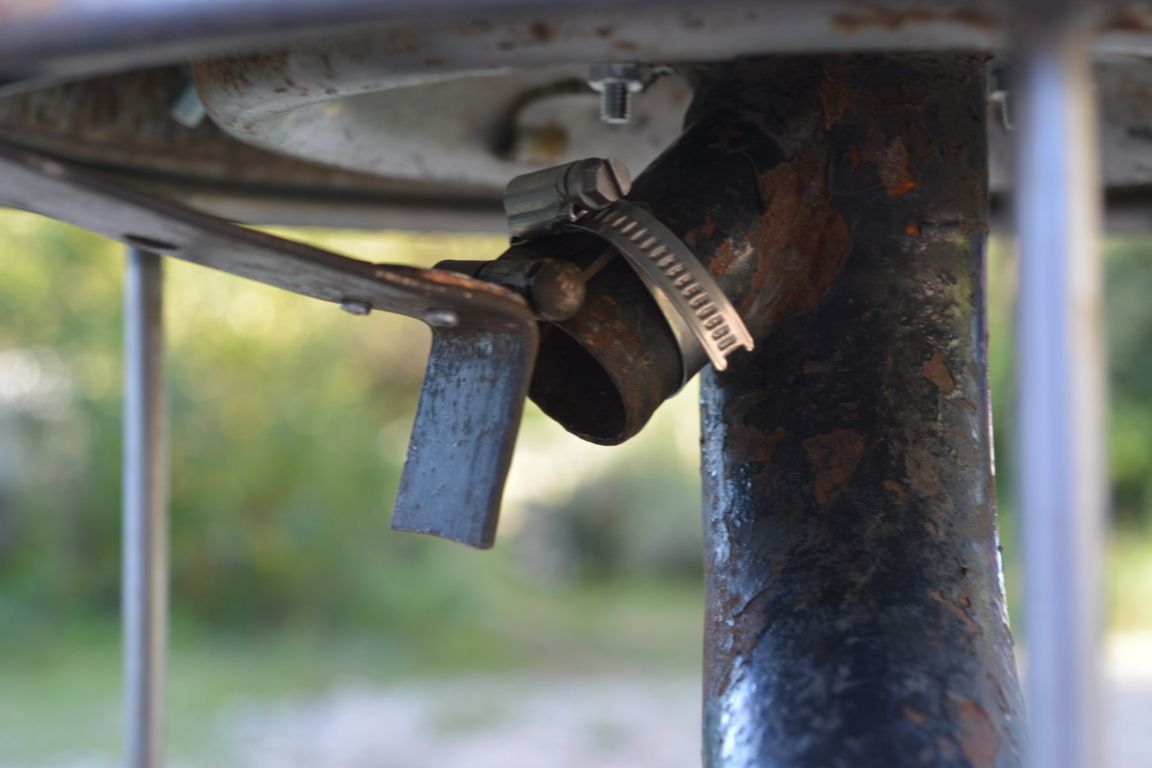
Step #1: Cut the hinge in half. To do this remove the pin from the door hinge this can be done by using a nail and hammer, putting the hinge in a vice with the head of the pinpointing down placing the nail on the pin bottom (head pointing down), and hit it with a hammer lightly, most hinge pins aren't held in place to tightly, the pin should just pop out, next separate each side of the hinge and hacksaw in half, then cut the pin (the side with the head) a little bit more than the width of the new half hinge about 5-6mm more, this is so we can resemble the new half hinge, we will need to widen the non-head side once assembled so the pin does not fall out, just put the head of the pin on a hard surface (holding the hinge closed) and hit the pin bottom a few times around it's edge, this will widen the end out and stop the hinge from coming apart.
Step #2: Bend the piece of metal 90 degrees or if your ash release is pointing straight down, 45 degrees. The bend should be longer on one side so the weight of longer length being pulled down by gravity, keeps the ash trap closed the end covering the ash outlet should just cover the outlet but not be any bigger than necessary.
Step #3: Rivet or bolt the hinge to the ash trap, making sure this hinge pin side is facing up or it will stop the ash trap from closing with a good seal. You will need to drill two holes to do this make sure the hinge will align properly with the outlet and be able to open and close before drilling the holes.
Step #4: Use a hose clip to fasten the other side of the hinge to the outlet pipe, taking your time to align it up for the best results.
By now we have a pretty solid looking forge but unlike mine you don't have a stand for it, the stand I found was very "niche" and I doubt anyone will be able to find something similar, it's a plastic bin bag holder.
So for most of you I'd recommend just getting some clay or fire bricks and placing them down to rest it on. Digging a hole in the ground will also work, well if there is nothing flammable near by like dry grass etc.. You should be able to find a stand fairly easily, just make sure it very sturdy and can withstand a fair amount of heat before you light up the forge.
If you're thinking of building one with bricks we have a few recipes for refractory cement you might be interested in.
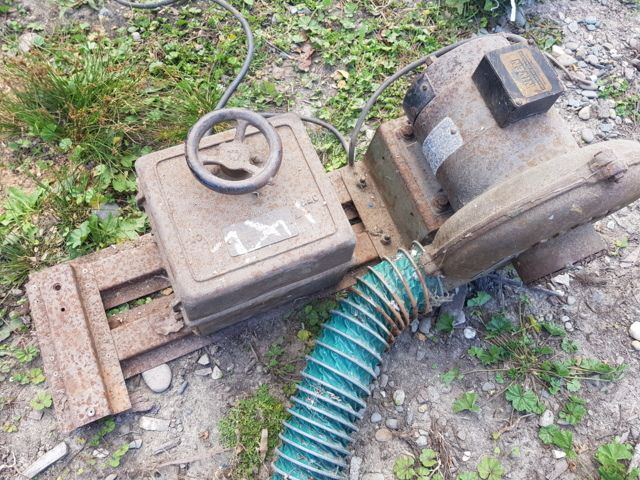
Finding an Air Blower for your forge
The air blower or electric billow can be the most expensive part of your new homemade blacksmithing forge or rather cheap, it's up to you how you want to go about it.
This one on Amazon looks pretty good Electric Blacksmith Forge Blower (I don't own one however).
The cheap option, that works much better than you'd expect is to get an electric hair dryer, the airflow a hairdryer produces is sufficient enough to run your forge, Google "hair dryer forge" if you don't believe me!
What you see below is the electric blower that cost me $50 NZD (That's $37 USD or £26 GPB) from a scrap dealer, blowers like this can be brought on online for around 80 USD new.
Blacksmithing Tools and Books
Books: The Home Blacksmith: Tools, Techniques, and 40 Practical Projects for the Blacksmith Hobbyist
Basic Gear:
- Leather Blacksmith Apron
- Welding Gloves Lined with Leather
- Blacksmith Wolf Jaw Tongs
- Stanley AntiVibe Blacksmith Hammer
- Grizzly Anvil, 55-Pound
What are some blacksmith projects you have/want to undertake? let us know in the comments.